In depth tutorial on managing ZFS Datasets
Introduction
ZFS pools provide us with the underlying storage with which we can create files and directories inside it right after we create it. But OpenSolaris and ZFS provides more than that by introducing ZFS datasets…
In this recipe we will work on top of a zfs pool named fpool and the default root pool named rpool. So before continuing on this recipe we should have a pool named fpool created. Creating ZFS pools is discussed in the recipe 9, Creating and Destroying ZFS pools, of chapter 2.
1. Getting list of ZFS datasets
In this recipe we will discuss how we can get the list of ZFS datasets and also how to get detailed information about a dataset.
Getting ready
In this recipe we will work with list subcommand of the zfs command.
How to do it…
We can use the list subcommand of the zfs command to get list of available datasets. Like zpool command we can use this command with a pool name or without a pool name to get list of all available datasets in the system. The simplified schema of the list subcommand is shown below:
|
|
The -r option specifies that we want to see a recursive list of all child datasets in addition to root datasets.
The -H specify that we do not want to see the header row of the printed information.
The list_of_pool arguments specifies a space separated list of pools we want to see their datasets, passing no argument means we want all datasets of all pools to be included in the output.
For example to view list of all datasets recursively in both rpool and fpool we can use the following command.
|
|
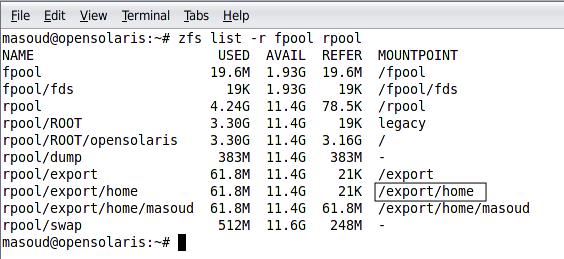
As we can see in the figure, the child datasets are also listed in the output. One thing which we might notice is the differences between a ZFS file system name and its mount point, especially for the zpools. Each ZFS dataset has a mount point which can be different than its name and its location in the parent dataset. When we are using commands like zfs and zpool we will refer to the name of the dataset and when we ware accessing a file system dataset we use the mount point.
How it works…
The command reads metadata related to the questioned pools and print them in the output. Metadata information of all ZFS objects are stored in /etc/zfs directory.
See also
We can get more information about datasets using their properties which is discussed in the last recipe of this chapter.
2. Creating and destroying ZFS File System
We can create and destroy a ZFS file systems using create and destroy sub commands of the zfs command.
Getting ready
To get started with this recipe we need to have a pool named fpool, so before proceeding further create a ZFS pool named fpool. We can find how we can create ZFS pools in recipe 9 of chapter 2.
How to do it…
To create a ZFS file systems we should use the create subcommand of zfs command. The command syntax is shown below.
|
|
The -p option specifies that any non-existing parent addressed should be created.
The -o can be used to pass ZFS properties to be assigned to the command. For example we can use it to enable the compression during dataset creation. We will discuss more about these properties in recipe number….
The file systems argument specifies the dataset path we want to create. Any of the non-existing parent file systems specified in this argument will be created recursively provided that we use -p option.
Now to create file systems named parent/fset inside the fpool we can use the following command based on the above syntax.
|
|

To destroy a dataset we can use the destroy subcommand of the zfs command. The command schema is as follow:
|
|
The -r option asks the command to destroy all descendents of the target dataset.
The -R option asks the command to destroy all depended objects like clones and snapshots. We will discuss clones and snapshots in recipe number
The -f option force unmount any mount point.
The argument specifies type of the dataset we want to delete; either it is a volume, a file system or a snapshot. We will discuss volumes in next recipe.
To delete the parent dataset with its entire child we can use the following command.
|
|

How it works…
When we create a ZFS dataset its related records are inserted in ZFS metadata storages located at /etc/zfs and any further access to the file system will update these records.
Renaming a ZFS file system
We can rename a ZFS dataset using the rename subcommand of the zfs command. For example to rename the parent file system we created previously we can use the following command
|
|
See also
In the next three recipes we discuss managing other types of datasets available in ZFS including volumes, snapshots.
3. Creating and Destroying ZFS volumes
In this recipe we will see how we can create or destroy a ZFS volume using the create and destroy subcommand of the zfs command.
ZFS volumes provide the software systems which require a block or character device to benefit from the storage pooling of ZFS pools and in the same time has the freedom of accessing the storage in block or character mode.
Getting ready
To get started with this recipe we need to have a pool named fpool, so before proceeding further create a ZFS pool named fpool.We can find how we can create ZFS pools in recipe 9 of chapter 2.
How to do it…
OpenSolaris installation creates two ZFS volumes one for SWAP area and the other for storing different dumps created when the OS face a problem. To see the list of volumes we can use the following command.
|
|
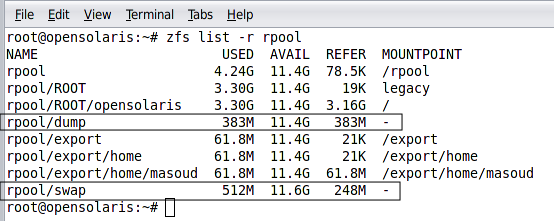
As you can see none of the volumes has a mount point because they are block devices and not file systems unless we format them and mount them manually.
To create a ZFS volume we can use the following syntax of the create subcommand of the zfs command.
|
|
The -p option similar to the -p option in creating dataset specifies that all non-existing parents addressed in the volume name should be created.
The -s option specifies that we want to create a sparse volume. In contrast with normal volumes sparse volumes does not occupy any space after we created them and the volume size grows when we copy some data into it. The maximum size is specified using the -V parameter.
The -b option is similar to using -o volblocksize option which let us determine the volume block size.
The -V parameter specifies the volume capacity or size, if we use the -s parameter the size will not get allocated immediately but rather the volume grows when we copy some data into it.
The volume argument specifies the volume name.
For example to create a volume named fvol with a fixed size of 100 MB we can use the following command.
|
|
|
|
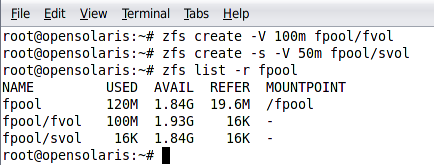
When we create a volume we can access it using its associated raw and character node names.
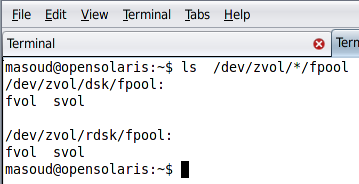
The raw name for each ZFS volume consists with /dev/zvol/rdsk/pool_name/volume_name naming schema
The character name for each ZFS volume consists with /dev/zvol/dsk/pool_name/volume_name naming schema
To understand the naming schema better, the following figure shows how these volumes appear in the block and character devices list.
Using sparse volumes is not a good move when we have sensitive applications utilizing the volume because the volume may not be able to grow when there might be no empty space left in the pool when the volume requires growing.
Destroying a volume is similar to destroying a file system which we discussed in recipe 2. For example we can use the following command to destroy the fvol
|
|
How it works…
When we create a ZFS volume, all related metadata for the volume will be stored in the ZFS metadata storage located at /etc/zfs and the space we assigned to the volume will be reserved for the volume and will be subtracted from the underlying pool’s available space. The volume’s node will be created in the /dev/zvol subdirectories to allow both raw and block access level to the volume.
Destroying a pool return back the allocated space, remove the associated records and also delete the volume node names created in the /dev/zvol subdirectories.
See also
You can take a look at recipe 2 and 4 which contains more information about different types of datasets supported by ZFS.
4. Creating and Destroying a ZFS snapshot
In this recipe we will learn another ZFS dataset named snapshots.
Getting ready
To get started with this recipe we need to have a pool named fpool, so before proceeding further create a ZFS pool named fpool.We can find how we can create ZFS pools in recipe 9 of chapter 2.
We should create a file system named fset to continue with this recipe. Creating file systems dicussed in recipe 2 of this chapter.
How to do it…
To create a snapshot we can use the snapshot subcommand of the zfs command. The command syntax is as follow:
|
|
The -r specifies that we want to create snapshot from all descendent datasets of the target dataset.
The -o specifies a property we want to set during the snapshot creation.
The filesystem@snapname | volume@snapname specifies the snapshot name.
A snapshot is created from a file system or a volume and conforms to a naming schema similar to dataset_name@snapshot name. In the naming schema the first part is the dataset name for example fpool/fset followed by @ character and then the snapshot name like before_migration.
To create a snapshot named initial from the fpool/fset we can use the following command
|
|
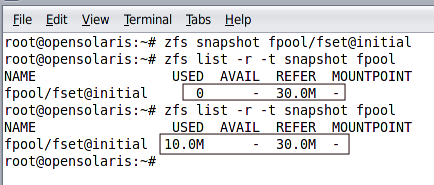
The main purpose of creating snapshot is to revert back to the point when we created the snapshot. To rollback the changes that a dataset have seen after creating a snapshot we can use rollback subcommand of the zfs command as follow.
|
|
How it works…
A snapshot as its name implies is an image of a file system or a volume in a specific point in time. The main reason behind creating snapshots is possibility to revert a file system or a volume back to a specific point in time.
Utilising the copy-on-write and metadata blocks, a ZFS snapshot does not occupy any space after we create it, and the creating process is amazingly fast. After the snapshot is created, any change in the file system will cause the snapshot size to increase in order to reflect the changed blocks.
There’s more…
Renaming a snapshot
Accessing snapshot data without reverting active dataset
See also
Recipe number 3 and 5 are closely related to the snapshots and reading them can give you a better understanding of this recipe.
5. Creating and Destroying a ZFS clone
In this recipe we will learn how to deal with ZFS clones.
Getting ready
Before we get down to the actual business of managing clones we should have an accessible pool and a dataset, either a ZFS volume or a ZFS file system, to study on.
I assume that we have fpool and a file system named fset in our disposal to work with.
How to do it…
We can use the clone subcommand of the zfs command to create a clone. The command syntax is as follow:
|
|
The -p option specifies that all parent datasets need to be created if not existing already
The -o allows us to specify some options for the clone. List of all properties for a dataset is discussed in recipe number 12
The source_snapshot specifies which snapshot we want to base the clone on.
The target_dataset specifies where we want the clone to be created. The target_dataset is of the same type as the source_snapshot is based on.
To create a clone we need a snapshot so, lets create one.
|
|
|
|

A clone can not be created in any pool other than the pool which original dataset resides because of the copy-on-write nature of the ZFS and use of metadata blocks for referring to unchanged data blocks.
Now that we have a clone to experiment on, we may need to replace the original dataset with the clone after we succeeded changing the dataset in the way we need. This is called promoting as we are promoting a clone to become the original. The following command shows syntax of the promote command which we can use to swap the clone place with the original dataset.
|
|
|
|
Destroying a dataset which has dependencies like snapshots and clones is easy when we want to destroy the clones as well. We just need to use the -R option to destroy all dependencies including snapshots and clones. But if we only want to destroy an underlying dataset we should promote one of its clones to take its place and then destroy the dataset without harming dependent datasets.
For example following set of commands promote the initial_clone and then destroy the fset file system.
|
|
How it works…
A clone is a writeable copy of a dataset, a volume or a file system, which its initial data is the same as the original dataset it is created from. A clone can be initialized from a snapshot of the file system and its initial creation is as fast as creating a snapshot because of the copy-on-write nature of the ZFS file system. A clone size grows in time when we change the clone or the original dataset content.
See also
Recipe 2, 3 and 4 are closely related to this recipe as they explain ZFS file systems, ZFS volumes and ZFS snapshots. Reviewing them can help understanding this recipe better.
6. Specifying ZFS mount point
In order to use a file system, we should mount it to a mount point so we can read from the file system or write into it.
Getting ready
To get started with this recipe we need to have a pool named fpool, so before proceeding further create a ZFS pool named fpool.We can find how we can create ZFS pools in recipe 9 of chapter 2.
We should create a file system named fset to continue with this recipe. Creating file systems dicussed in recipe 2 of this chapter.
How to do it…
Let’s create a file system and see where it is mounted by default. Following command creates fset in the fpool.
|
|

Now let’s use -o option and its argument to change the mount point during file system creation.
|
|
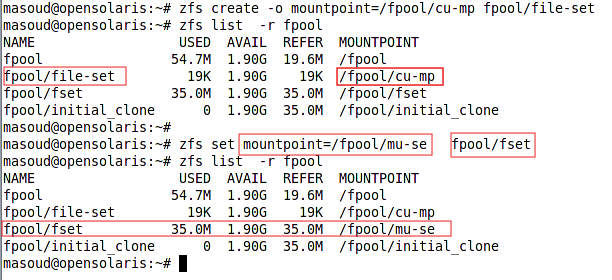
How it works…
When we create a ZFS file system, the ZFS assign a mount point to the file system we created and which complies the default naming schema which is pool_name/file_system/ though the file_system argument itself can have multiple levels. This mount point is stored as a part of the file system metadata in the /etc/zfs and when system is booting it uses this storage to layout the file system as we configured.
See also
We can use the mount table to mount a ZFS file system for integrating with legacy software. More information about legacy mode is available at http://docs.sun.com/app/docs/doc/819-5461/gaynd?a=view
7. Replicating a ZFS dataset
In t recipe 5 of this chapter we saw how we can clone a dataset but that has its own limitation as it only works inside the mother pool containing the dataset. What if we need to move a dataset from one computer to another or from one pool to another. You may suggest using commands like tar, cpio, and dd which we discussed in recipe NO of chapter 1. Sure we can use them but those commands have their associated drawbacks which we discussed in the related recipe. To facilitate replicating a dataset between different pools or different machines ZFS provides a send and receive subcommands of the zfs command.
Getting ready
For this recipe we assume that we have two pools named fpool and mpool in one machine, we also assume that we have another machine with ssh server running in a remote machine networked with our workstation. To learn more about ssh review recipe in chapter
How to do it…
In brief, the send and receive subcommands of the zfs command can do the following tasks for us.
Sending a ZFS Snapshot means that we can read a ZFS snapshot and send it to a destination. The destination can be a binary file or the receive command.
Receiving a ZFS Snapshot means that we receive a ZFS snapshot sent by the send command and writes it in the file system in the same order it was in the origination pool.
Remote Replication of ZFS Data: we can use combination of piping zfs second command with ssh and zfs receive commands to send a snapshot from one machine, piping it with ssh executing zfs receive command in a remote machine to write the snapshot on the remote machine.
The following command sends a snapshot of the fset file system from fpool to mpool/nset. So the content of the mpool/nset will be an exact clone of the fset when the snapshot was taken.
|
|

Now lets see a more complicated sample of using the send and receive commands by sending the snapshot over SSH to another machine.
|
|
When using SSH client command, ssh, without passing any username it assumes that we want to authenticate using the same user we are loged-in in our local machine. For more details about using SSH review recipe in chapter
But the send and receive commands has much more to offer, we can incrementally by sending a group of snapshots to the destination in the same order we have created them. For example following command will send two snapshots named sn1 and sn2 to create the destination file system identical to the state of original file system included in the sn2 which itself is an increment of sn1.
|
|
How it works…
The send command sends the dumped dataset as a stream to the designated output which can be the default output (screen) or any other output target specified using the pipe operand.
The recv command write the file system it receives into the specified dataset as it receives it.
See also
To understand this recipe better reviewing recipe 4 of this chapter and recipe N of chapter is recommended. To learn more about send and receive commands we can refer to man pages and also the online document available at http://docs.sun.com/app/docs/doc/819-5461/gbchx?a=view. To see whish other additional software are available to replicate a ZFS dataset take a look at
http://hub.opensolaris.org/bin/view/Community+Group+zfs/faq/#backupsoftware
8. Managing datasets’ properties
In recipe8 in chapter one list of a zpool properties are listed, the list is quite short because of the ZPools nature but for the ZFS datasets we have tens of properties which are either specific to a dataset type (volume, file system) or are shared between both of them.
Getting ready
In this recipe we will work on read-only and writeable properties of ZFS datasets. I assume that we have a pool named fpool and a file system named fpool/com to demonstrate the related commands.
How to do it…
We said that tens of properties are at our disposal to use for our benefit but these properties has some values assigned to them when we create a dataset. These values come from three sources which are listed below.
Default: Some properties have default values, like block size for the dataset, or compression status.
Inherited: each dataset can inherit its parent properties’ values if we specify
Assigned: We assign some properties’ values when we create a dataset like the dataset name.
The following table shows important properties of ZFS datasets. Each a description of these properties is given in the http://docs.sun.com/app/docs/doc/817-2271/gazss?a=view . The table specifies whether the volume, file system, clone and snapshot have the property or not.
| Property | File System | Volume | Clone | Snapshot |
|---|---|---|---|---|
| atime | ||||
| available | ||||
| checksum | ||||
| compresiion | ||||
| compressionratio | ||||
| mountpoint | ||||
| quota | ||||
| readonly | ||||
| type | ||||
| used | ||||
| copies | ||||
| volblocksize | ||||
| secondarycache | ||||
| usedbysnapshot |
Some attributes are solely available to file system and some for a volume. But snapshot and clones share a subset of the properties available for their base dataset. For example a clone made from a file system has the mount point property while a clone made from a volume does not.
Some of these properties are read-only meaning that the system itself sets their values, for example available and used, which contain the amount of space available to the dataset and amount of space used from are read-only and only operating system can change them.
We can use two zfs subcommands to set a value for a property or get the current value. Following commands show how we can do it.
|
|
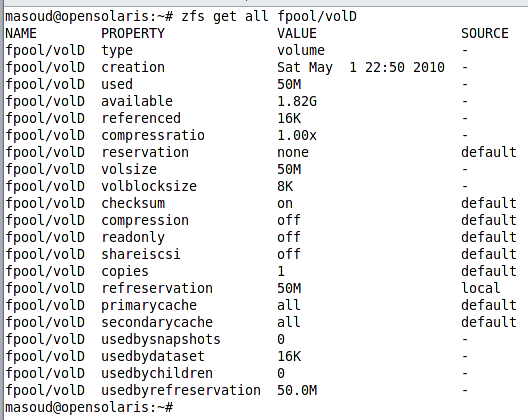
ZFS datasets inherits many of their properties from their parent datasets. For example if we enable compression in the fpool/comp and then create fpool/comp/inner, the compression algorithm for the fpool/comp/inner will be the same as the compression state of the parent dataset.
Sometimes we do not want a property to get inherited by a parent dataset, for example we may specify a custom mount point for a file system when we create it and we do not required the descendent file systems to use the same mount point we can use inherit subcommand of the zfs command to prevent descendent datasets to inherit the custom mount point.
|
|
The combination of get and set commands helps us in developing shell scripts to automate our daily jobs. We will discuss more about shell script development in chapter.
How it works…
All ZFS attributes and properties are stored in the ZFS metadata storage located at /etc/zfs. When we invoke a set subcommand or any of the dataset creation command we either insert new records into this storage or we edit the already existing information. When we use get subcommand or any other zfs subcommands, we read the metadata stored in this database. OpenSolaris uses the information stored here to layout the file system during operating system boot-up.
There’s more…
We can define and later on use custom properties for a ZFS dataset specifying descriptive information for our administrators and users. For example we can create a custom property named used-for to specify what we are using a dataset for. All custom dataset are pre-fixed with : to let us know a property is custom or native to ZFS.
To set a custom property we can use set command as shown below.
|
|
|
|

See also
For some example of using the set and get commands review recipe 9 and 10 which deals with deduplication and the compression in ZFS file systems.
9. ZFS De-Duplication
Deduplication is a file system level space saving method in which redundant data is eliminated.
Getting ready
To get started with this recipe we need to have a pool named fpool, so before proceeding further create a ZFS pool named fpool. We can find how we can create ZFS pools in recipe 9 of chapter 2.
We should create a file system named dedup inside this pool to makes it possible for the sample commands to execute properly.
How to do it…
We can enable deduplication during file system creation or afterward using the set command.
Following snippet shows how we can enable it for an fpool/dedup file system during file system creation.
|
|

We can also use the set command to enable deduplication for a file system after we create it. Following command shows how we can turn off the deduplication in the fpool/dedup file system.
|
|
How it works…
Deduplication operates in the file level so the file system checks every file and decide whether the file already exists in the system or not if the file already exists, the file will not be stored and instead a reference to the already existing file will be used. For example in a typical enterprise mail server one email attachment may find its way into hundreds of users mail boxes, Deduplication will store the actual file once and all other instance of the file are referenced to the same actual file.
When we enable deduplication for a file system either when we create the file system or afterward using the set subcommand, we are asking OpenSolaris to only keep one copy of each single file stored in the hard disk and use reference to that single copy when necessary.
See also
1.To learn more about ZFS dataset properties and their usage review recipe number 8.
10. ZFS compression
In this recipe we will see how we can enable the ZFS compression to save space. We usually enable the compression when we rarely need to read the dataset content or the reading operation does not need to be performed fast.
Getting ready
We can enable the compression on both file systems and volumes. Compression can be enabled during the dataset creation or we can enable it after we created the file system and we felt that we need more space rather than higher I/O speed.
How to do it…
Following command creates a ZFS file system named comp with compression enabled and a custom mount point instead of the default mount point.
|
|
|
|

We can use the set command to enable the compression or change its algorithm on a dataset. For example to change the compression algorithm in the fpool/comp we can use the following command
|
|
| Value | Description |
| on | Turn on the compression using the default algorithm (lzjb). |
| gzip-N | same algorithm and compression ration which gzip provides. The N can be 1 to 9 which specifies the compression level. While 1 means no compression 9 is the highest compression level with most CPU usage |
| gzip | The gzip algorithm with default compression level set to 6. |
| lzjb | default compression algorithm which is a performance friendly algorithm with an acceptable compression ratio |
| off | turn off the compression for the given pool. |
How it works…
When we enable the compression, our data get compressed before the get written into the disk using the algorithm we specified. When reading the data, each block of data go trough decompression and then upper level applications receives the uncompressed data.
When we disable the compression, no further compression is applied on the data we write into file system but the data which are already compressed will stay the same.
See also
To learn more about ZFS dataset properties and their usage review recipe number 8.
11. Defining quota for ZFS
Getting ready
We will use the quota and reservation properties of ZFS file system to set a limit on the amount of space the file system can use and amount of space which the pool must have in reserve for the file system.
How to do it…
Assuming that we want to limit the fpool/fset to 1 GB we can use the following command.
|
|
|
|
The overall size of the fset and all of its descendent datasets can not exceed the 1GB limit
At each point at time, the fpool has at least 200 MB space ready to be used by the fset. This space will be allocated and counted as used space of the pool.
Following figure shows how the reservation and quota properties’ value can affect the status of a zfs dataset.
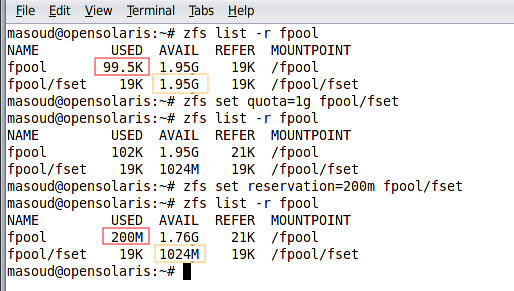
As we can see before we specify the quota, the whole 2 GB of the fpool is available for the fpool/fset while after we specify the quota only 1024 MB of that space is available for the fpool/fset.
On the next step, before we specify the reservation, just 102 K of the pool was used while after specifying the reservation; 200 MB of the pool were gone for good.
How it works…
Defining quota in ZFS is very different compared to defining it in UFS which is described in recipe 7 of chapter 2. In ZFS we define the quotas in file system level for the file system itself and not for users’ usage. In ZFS we specify how much space a file system can use in the pool, quotas of that file system, and how much space the pool must have reserved for a specific file system.
To limit how much space a user can use we will assign a file system to the specific user to prevent it from using more than quoted space. To lean more about security and user access management review chapter ? recipe ?
See also
To learn more about quota take a look at recipe 7 of chapter2. For leaning limiting the amount of space a user can have take a look at recipe of chapter.