Managing and Administrating OpenSolaris Zones
Introduction
The Solaris Zones provide us with kernel level virtualization allowing us to create multiple virtualized environments on top of the host system kernel. Each one of these virtualized environment is isolated from host and other virtualized environments despite running on the same Kernel which is provided by the host or global zone.
A typical example of using zones can be hosting different applications like the HTTP server, different application server instances for different applications, and the database server in separate zones. This separation and therefore isolation of different applications into different zones bring the following benefits.
Possibility to control, cap, apply restrictions and share the resources like CPU, memory, disks, network interfaces, etc.
Ease the monitoring and management of the all related applications by hosting them in one single machine.
Proving each application administrator with enough space to configure its system security and apply the performance tweaking while controlling all of them from the global zone.
Ensure that any performance or security issue with each one of the applications will not affect the other infrastructure members.
Another use case for zones can be allocating resources of a powerful machine between different use cases or departments; each department has the freedom to install applications it requires while the underlying operating system will be managed by one single administration.
1. Creating a Zone
In this recipe we will create a none-global zone and familiarize ourselves with different zone administration utilities including zonecfg and zoneadm.
Getting ready
We will use CLI utilities so we need to either switch to one f the virtual terminals or open a gnome-terminal.
How to do it…
We can use the zonecfg command in interactive or shell mode to create a zone following snippet shows how we can create a zone in the interactive mode. The answers that we need to provide to the zonecfg command are highlight and we will discuss them afterward.

After we enter the zonecfg shell it detects that the zone we want to configure does not exists and offers us to create the zone by invoking the create command. By invoking the create command we add the zone creation request to the batch of tasks we are stacking in the zonecfg shell.
After invoking the create command we should specify the zone file system root path. In our case we entered /fpool/zones/fzone.
The next thing that we should do in addition to specifying the zone path is adding a network interface to the zone because the zone creation and installation will need to access package repositories in order to install some packages into the zone. To add the network interface we should specify an IP address or a host name for the zone in addition to the physical network interface we want to create the zone virtual interface on top of it.
Invoking end exit the current sub shell and invoking exit commits all changes we requested and exit the shell.
Now we can check existence of our zone configuration using zoneadm command as shown in the following figure.

In the figure 2 we can see a column named Brand, this column shows what is the zone type as we can have different types of zones including native, ipkg, cluster, solaris8, solaris9, etc. The Native brand uses the old packaging system, the ipkg uses the new IPS, and the cluster is the brand name for the Cluster zones. The solaris9 and solaris8 zones are provided to support running software compatible with Solaris 9 or Solaris 8 in Solaris 11.
Now we have a zone configuration stored as an XML file in the zone management repository, what we need to do next is installing the zone which is actually realizing the configuration into a bootable, isolated Solaris installation on top of the running operating system.
We can install the zone using the zoneadm command as shown below. The zone installation process requires Internet access or access to a local network package repository. In our case we will use the main repository available on Sun network.
Following figure shows how we invoke the zoneadm to install the fzone. The system will download the necessary packages and install them to provide us with the minimum bootable zone.

Now that the zone is installed we can boot into the zone using the boot subcommand of the zoneadm command as shown below.
|
|
|
|
The terminal type: The first step will be specifying the terminal, we can select from 6 different terminals including xterm which is my favourite. After specifying the terminal, system generates the SSH key pair and continues to the next step.
The host name for the zone: After the key pair we should specify the hostname for the zone, by default the zone name will be the host name but we can change it to whatever we want in this step. To continue to the next step we should press Escape+2 buttons.
Security service: After the host name we can select either we want to use Kerberos authentication or not, select no and press Escape+2 buttons.
Name Service: Here we should specify the Name Service we want to use, select none and continue to the next step.
The NFSv4 Domain Name: Here we should select the network file system domain name, let the system use the host derived domain name.
The Time zone: In this step we specify which time zone we want our zone to use by specifying the continent and then the country.
The Zone password: Here in the final step we should specify a root password for the zone. Something simple like fzone for our snippet should work but in production the password must be combination of alphanumeric at least.
Now the zone is booted and we will be asked for username and password to enter the zone shell. Provide root/fzone as username and password to login into the zone.
How it works…
When we install Solaris we have one zone created by default which is called global zone. The global zone represents the entire operating system and can host as many as 8191 non-global zones.
Each none global zone is a virtualized environment with its own host name and a virtualized network interface. Each zone has its own security boundaries and its storage and processing resources are assigned to it from the global zone.
As each none-global zone acts as a complete an isolated instance of Solaris, it needs utilities, libraries and applications accessible to it. The model in which Solaris provides the zone with the libraries and utilities differentiates the zones into two categories as follow:
The sparse-root zone: In this model the zone has read-only access to /lib, /sbin, /usr, /platform directories of the global zone and therefore any changes in those directories will be reflected in the zone. On the other hand we cannot install applications which need write access to these directories into a sparse-root zone. The benefit of this zone is ease of administration and small footprint while its drawback is limited capability in installing new packages into the zone.
The whole zone: In this mode we have full control over the file system layout of the pool and the packages and application we want to install but this will cost us a little more space.
See also
Make sure that you review other recipes of this chapter as this recipe was just the door to the Solais Zones world. In next recipe we will see how we can control resources allocation for a Zone or how we can create a Linux zone instead of a Native Solaris zone.
Zone Networking
In this recipe we are going to see what are networking options in a zone and how we can use these options to further configure a zone to fit our requirements.
Getting ready
In this recipe we assume that we have a zone installed according to the previous recipe and then we will tweak its networking configuration.
How to do it…
Assuming that we have a zone created using the previous recipe we can use the zoneadm command to see the zone configuration as shown in the following figure.

As you can see under the IP column, we have shared as the IP type of the fzone. Basically this means that one IP stack and physical network interface is shared between the global and the non-global zone using a virtual network interface built on top of the physical interface we specified during the zone creation. When sharing an IP stack between a global and a non-global zone, the global zone takes care of IP routing and if we share the physical interface between multiple zones, packets won’t leave the system and get routed in the global zone kernel. Following figure shows how the logical interface is created on top the e1000g1 for the fzone to have network access.
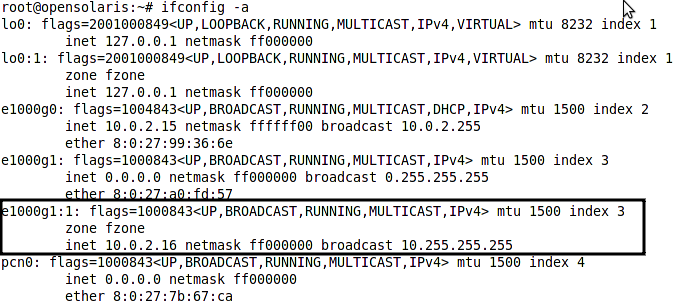
The logical interface won’t appear in the output of the ifconfig command unless we boot the zone. The command to boot a zone is as follow:
|
|
We can add use virtual interface, VNIC, physical network interfaces for a zone, to do so we only need to reconfigure a zone’s networking or specify the physical or virtual interface during the zone creation.
We can configure a non-global zone with exclusive network interface using the following steps.
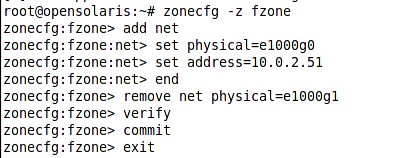
As you can see we removed the shared interface from the zone and give it the exclusive access to the e1000g0.
To make the changes effective we need to restart the zone. To do so we can halt the zone using halt command inside the zone shell or we can use the following command from the global zone.
|
|
How it works…
When we use logical interfaces to share a physical interface between different zones, the interface configuration is not changeable from within the non-global zones which increase the overall security of system.
There’s more…
We can create a virtual interface using the dladm command and then assign that interface to the zone or we can create an aggregation and exclusively assign the aggregation to a zone.
3. Managing a zone resources
In this recipe we will learn how to allocate and control the resource that a zone can utilize. For example how much CPU cycles and how much memory a zone can use.
Getting ready
Before we get down seeing how we can apply the resource control we need to have some basic knowledge of two different CPU cycles allocator available in Solaris.
The Fair Share Scheduler, FSS: The FSS ensure that all parties, zones, at least get what we allocate for them. For example if we have 4 zones running and all of them are very busy the FSS ensure that each zone receives its fair share of CPU power as allocated by the administrator. Meanwhile if we have one very busy zone and 2 idle zones, the FSS allows the busy zone to get more than its share of CPU cycle until another zone requires receiving its allocated share.
The Time Sharing scheduler: This schedule is the default scheduler in Solaris and acts based on the time slices independent of whether the zone requires the allocated time slice or not. For example if we have three zones, one very busy and two idle zones, the TS will gives each of these zones the time slice specified regardless of it not doing anything with the CPU power and one zone starving for the power.
Capping: The capping resource controlling feature allows us to place a cap on the amount of resource the zone can use regardless of more resource being available at the time.
The default CPU sharing mechanism is TS and we if we want to use the FSS we should enable it. To replace the TS with FSS we can use the following command
|
|
|
|
|
|
How to do it…
To configure and apply resource control for a zone we use the zonecfg command and change the value of different zone attributes. Following table shows the resource that we can control and specify its value for a zone along with a basic description of attribute.
| Resource Type/ Corresponding Zone property | Description |
|---|---|
| CPU Shares/ cpu-shares | Specifies how much of the system CPU power we want the zone to use. |
| Maximum number of processes/ max-lwps | Specifies how many process a zone can spawn. |
| Maximum number of semaphores/ max-sem-ids | Specifies how many semaphore lock a zone can acquire |
| Maximum size of a shared memory segment /max-shm-ids | Specifies what is the maximum size of a memory segment for a zone |
| Total amount of shared memory/max-shm-memory | Specifies how much RAM/ SWAP a zone can allocate. |
| Maximum number of message queues/max-msg-ids | Specifies how many message queue a zone can create for asynchronous processing. |
Let’s assume that we specified a cpu-share value for our zone and we are using FSS as the scheduler. Assuming that we have two zones, one the global zone and one the local zone named fzone, we allocate 3 shares of CPU for the fzone, it means that the whole CPU power of the machine will be divided into 4 shares which 3 goes for the none-global zone and one share goes for the global zone. If at a later time we add another zone to the system with 2 share then we the FSS will divide the CPU power into 3+1+2 shares. From this 16% goes to the global zone, 48% goes to the fzone and 32% goes to the zone arrived at last.
All of the above numbers are flexible when using FSS, for example if all other zones are idle then all available CPU power goes to fzone and if other zones are busy each one get the amount of CPU we specified.
Now let’s get down to the work and apply the following control over the resources that fzone can utilize.

Now to check the resource control restrictions we have just applied we can use the the zonecfg command as shown in the following figure.
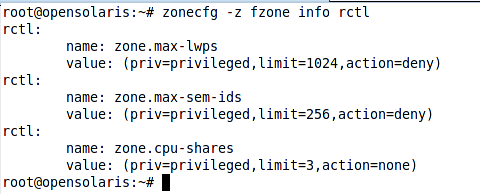
In the above figure, the resource names are cited in the full name instead of the simplified names and syntax we used to set the attributes value.
In the beginning of the recipe we discussed the CPU and memory capping as a mechanism to prevent a zone from using more a certain cap even if the resource is available in the system, like when we use FSS and CPU power is available for the zone to use.
To apply capping we should use resource scopes in the zonecfg shell. For example to cap the fzone memory usage we can use the fzone as shown in the following figure.
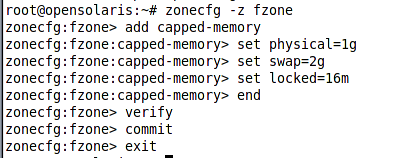
For the fzone we are setting the maximum amount of memory to 1 GB, the maximum amount of SWAP to 2GB and the maximum amount of lockable memory to 16 MB. The SWAP space we specified is the amount of swap that the zone’s user applications can use.
Next comes CPU capping in which we can specify a maximum amount of CPU which a zone can use despite the system being configured with FSS which means a zone can use al CPU cycles which are not in use by other process.
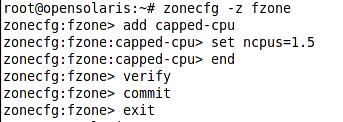
In our configuration we specified that the fzone cannot use more than 1.5 CPU even if more CPUs are free.
How it works…
To configure zone resources we have two ways, the first is using resource pools and the second way is to directly allocate resource to a zone. In the second method the Solaris kernel dynamically creates a pool, allocate the resources we assigned to the zone and use that pool as the zone resource pool. The pool will be created when the zone starts and it will be destroyed when the zone shouts down.
There’s more…
We can use dedicated-cpu scope to restrict the zone on the number of CPUs it can use and dedicate the CPUs to that particular zone when zone boots up.
See also
To review read more about resource management check recipe XX and recipe XY in chapter ZZ.
We can limit the bandwidth that a zone can use which is discussed in recipe XX of chapter ZZ.
4. Cloning a Zone
In this recipe we will look at how we can clone a zone which basically allows us to create a new zone based on an already existing zone to save time in file system management and configuration, software installation and so on.
Usually we clone a zone when we want to have several identical zones in term of file system layout and installed software. A simple case can be a zone with all required software fully configured or periodical clones of a test zone to ensure that we can quickly initialize a new test zone.
Getting ready
In this recipe we assume that we have the fzone created according to the first recipe of this chapter. We will clone the zone configuration into a new zone.
How to do it…
In our hands-on we will clone fzone into a zone named fzone-c. Before we could clone the fzone file system into the fzone-c we should create fzone-c, For sake of simplicity the only thing that we specify during the zone creation is the zone file system path. Following figure shows how we can create the zone.

Now that we have created the zone and specified its file system root we can clone the template zone into the newly configured zone instead of installing the zone. To clone the zone we use the clone subcommand of the zoneadm command as shown below.
|
|

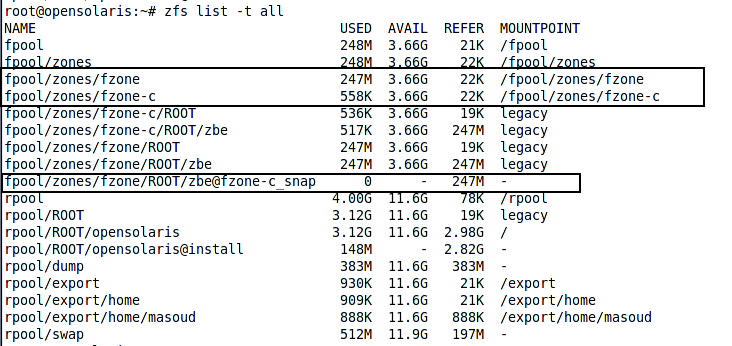
The new zone will be cloned in few seconds as it is a snapshot of the template zone. Following figure shows the difference in size of the fzone and its clone fzone-c in term of initial disk space usage.
Now we can boot the zone and login using the following commands which we discussed in details in the first recipe of this chapter.
|
|
How it works…
The whole zone cloning benefits from creating a ZFS snapshot of the template zone and then a ZFS clone based on that ZFS snapshot for the new Zone. Using this way, the new zone will have an identical file system layout with the template zone without using that much of a disk space and its creating will be immediate. The size of the clone will grow in time based on what we change in the new zone and in the template zone from which we created the snapshot.
There’s more…
Instead of using ZFS cloning we can use simply copy to copy the template zone file system into the new zone file system. The zone copying takes longer and consumes more space compared to zone cloning. We can use the following syntax of zoneadm to copy a zone.
|
|
See also
It is recommended that you review recipe 1 of this chapter and recipe
of ZFS chapter.
5. Migrating a zone
In this recipe we will look at how we can relocate a zone inside the same machine or migrate it from one machine to another.
Getting ready
For this recipe we assume that we have a zone named fzone created according to the first recipe of this chapter. We will move the zone to another dataset and then migrate it from its current host machine to a secondary machine.
How to do it…
First let’s look at how we can move the zone. In order to move a zone we should halt the zone either by invoking halt inside the zone or by using halt subcommand of the zoneadm in the global zone.
To move a zone we can use the move subcommand of the zoneadm command as shown below.
|
|

Now let’s see how we can migrate a zone from one machine to another. The steps for migrating a zone form one machine to another is as follow:
-
Halt the zone
-
Dump the zone configuration and detach the zone
-
Create and move the zone snapshot to target machine
-
Create a zone with same name in the target machine
-
Configure the new zone’s zonepath attribute to point to the received snapshot
-
Apply the zone manifest
Now that we know the steps let’s see how we can put these steps into practice. Let’s start with detaching the zone and saving the zone manifest.
|
|
The first step in the new host is creating a non-global zone and using the received snapshot as its zone path. I assume that we created the zone in the new machine and continue with the rests of steps. To learn how we can create a new zone review recipe 1 of this chapter.
|
|
How it works…
When migrating a zone, we are moving both its settings and its file system from one machine to the second one. The manifest file contains basic zone configurations like resource control, networking, package inheritance, and so on.
Creating a new zone using the same zonepath and attaching the configuration gives us the same zone that we had in the previous host without the need to go through configurations again.
See also
To learn more about ZFS you can review chapter 1 and chapter 2. These two chapters contain detailed instructions for each possible task with ZFS.
6. Controlling Zone network resource
In this recipe we will use the features that project crossbow introduced into Solaris operating system to apply resource control on a zone network usage.
Getting ready
Before we continue with this recipe I assume that we have a zone named fzone which uses a dedicated virtual interface named vnic1 for its network access.
We discussed how to create a zone and how to create the zone and how to configure it with the dedicated network interface review recipe 1 and recipe 2 of this chapter.
How to do it…
In order to configure anything regarding the zone networking we should have access to the global zone and the network resource control is not an exception. We can use the dladm we discussed in chapter X recipe Y to apply resource allocation on network resources.
Before getting down to applying the resource controls let’s see what is the default value for different resources allocation properties of the vnic1. To do so we can use the dladm command as shown in following figure.

As we can see there is no limit on the CPU and bandwidth, the MTU is set to default 1500 and the priority to high.
Now we will lower the priority to low, set a maximum bandwidth of 250 Mb per second, and delegate the packet processing for this interface to CPU number 3 using the following commands.
|
|

Different types of links like physical, aggregation, virtual can have less or more properties but the resource control properties are shared between all of them.
We can also impose restrictions on the bandwidth and flow of data on different port and different protocols using the flowadm command and the flow control capability of Solaris.
To impose limitation on different protocols and the traffic of different ports we should create a flow control and then add the restrictions to the flow control. For example let’s see how we can limit the traffic on port 21 to 10Mb.
First we should create the flow control as shown below
|
|
|
|

In addition to setting the maximum bandwidth we changed the priority of FTP port packet processing to low as it is not a critical protocol after all.
How it works…
When we change the resource allocation property of a network interface independent of which zone, global or none-global, it belongs to; the Solaris kernel place the caps on the interface resources as soon as the interface is brought online.
See also
To learn more about applying resource consumption restriction on Solaris zones review recipe 3 of this chapter.
To see a complete list of all flow controlling properties consult the documentation available at http://docs.sun.com/app/docs/doc/819-2240/flowadm-1m?l=en&n=1&a=view
7. Creating Linux zone
In this recipe we will see how we can create a Linux zone on top of the Solaris kernel. In the first recipe of this chapter we discussed the zone brands which can be lx, pkg, native, solaris8 and so on; the lx brand is the Linux zone brand which we are going to create in this recipe.
The lx brand, based on the BrandZ framework, provides the runtime environment equal to CentOS 3.x or any compatible distribution like Redhat Enterprise Linux 3.x as a Solaris zone.
Getting ready
Before we start creating and installing a lx zone we need to have the CentOS VERSIONN tarball or iso image available in the global zone for installation phase. A tarball of CentOS 3.VERSION is available at http://hub.opensolaris.org/bin/view/Community+Group+brandz/downloads
The second perquisite is the lx branded zone template which facilitate the zone creation. The template is available in the SUNWlx package. We can check whether the package is installed or not using the following command
|
|
|
|
How to do it…
Now that we have all the required pieces prepared we go get down to the zone creation and installation.
The only difference in the creation phase is the fact that we will use the SUNWlx template to create the zone, all other details like network configuration, resource allocation and so on remains the same.
Following figure shows how we can create the lz-zone based on the SUNWlx template.

I omitted adding networking and resource control during zone creation as we already discussed resource control in the 3rd recipe of this chapter.
Now that we created the zone it is time to install he zone using the zoneadm command and the tar archive we grabbed form the OpenSolaris website.
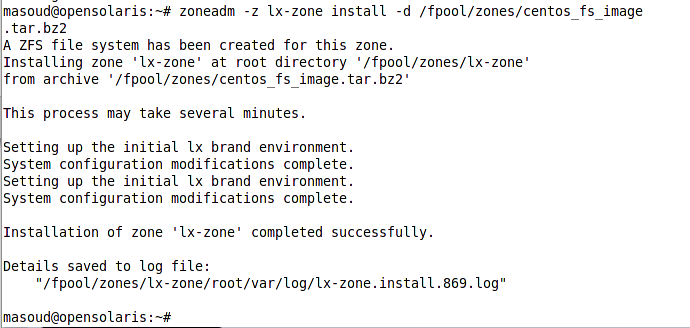
After installing the zone, it is time to review the list of zones and see status of our newly created zone using the list subcommand of the zoneadm command as shown in the following figure.

The brand name of the lz-zone is lx which reminds us that this is a Linux branded zone.
Now let’s boot the zone and login into the zone console. Following figure shows how to use boot subcommand of the zoneadm and zloging command to boot and login into the zone.
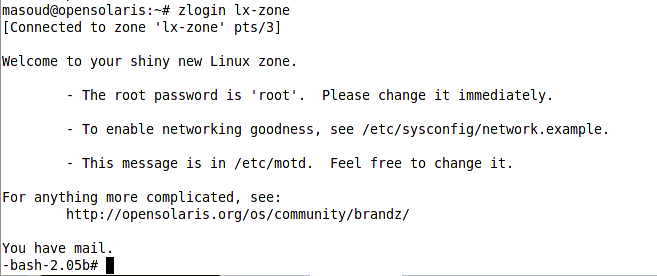
Finally we can use the uname CLI utility inside the zone to see the zone version.
![]()
The Linux zone’s networking is disabled by default; we can enable it by adding the required hostname and networking property in the /etc/sysconfig/network using any editor or a simple echo command which is shown below. Note that these commands should be executed inside the lz-zone shell.
|
|
How it works…
When the runtime environment of the none-global zone is not the same as the global zone a translation is required for all system calls from the non-native environment to the native environment in order for the guest to work on top of Solaris host.
The lx branded zones require all of the calls from the guest zone which is a Linux runtime with its own kernel to be translated to Solaris API and then executed on the hardware and the result will go back in the same translation phase to carry the final execution result to the Linux environment.
See also
To learn more about creating a zone and applying zone resource control reviewing the recipe 1, 2, and 3 of this chapter is highly recommended.
8. Removing a Zone
In this recipe we cover how we can remove a none-global zone from the system safely.
Getting ready
We assume that we have a zone named fzone and we want to remove the zone.
How to do it…
- In order to remove a zone we should follow the steps listed below,
Ensuring that no one is logged-in to the zone because we need to halt the zone before deleting it and halting a non-global zone from the global zone does not notify the users who are logged into the zone about the upcoming halt. To halt the zone we can use the following command from the global zone.
|
|
|
|
|
|
How it works…
When we use the uninstall sub-command of the zoneadm command we are basically removing the zone file system from hard drive and when we call the delete subcommand of zonecfg command we are removing the zone manifest and configuration from the system configuration store.
See also
To learn more about the zones structure and layout refer to first recipe of this chapter.