OpenSolaris Networking In Details
Introduction
In this chapter we are going to cover basic networking capabilities of OpenSolaris. While we will some of common utilities in the recipes, we will learn some more trivial ones here.
Learning netstat command
The netstat command is well known for checking the active connections status in a system but it can provide a fair deal of other diagnostics. Following sample command shows some of the netstat use cases.
List all ports:
|
|
|
|
|
|
Learning ping command
We can use ping, which uses Internet Control Message Protocol (ICMP) packets, to check whether a target address is accessible or not. For example to check whether 10.0.2.24 is accessible for us, we can use
|
|
|
|
Learning traceroute command
The traceroute command allows us to see which hops a packet goes through before it reaches its destination. By examining the hops we can determine which one of our network components causes delay or even drops the packet or has no route to destination address. For example:
|
|
1. Listing network Interfaces
In this recipe we will see how we can get a complete list of all plumbed network interfaces using the ifconfig command.
Getting ready
As we are using a command line interface (CLI) utility to get the list of available interfaces we should execute it in the console environment.
How to do it…
Following command shows how we can get list of all available interfaces.
|
|
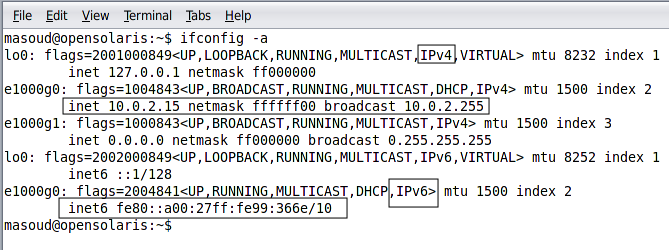
As we can see in the figure, the command lists all interfaces including the loopback interface and Ethernet ones. In addition the sample command we used lists both IPv4 and IPv6 enabled interfaces and separately show their addresses.
OpenSolaris follows a default naming schema for network interfaces it detects in the system.
Basically all Ethernet interfaces’ names starts with e100 or e1000 as the prefix and then g to gN as the distinguisher which distinguish each instance of the installed Ethernet card with another using an integer number.
All wireless card names are prefixed with wpi followed by a number indicating the card instance number.
Loopback interfaces are named with lo and then followed by a distinguisher number.
There are more schemas for other cards like pcnN, bgeN, switch which we will discuss in next recipes.
Variety of details might be shown in the flags area depending on the network interface driver. Some of most important flags are as follow:
The UP flag indicates that interface sends and receives packets.
The NOTRAILERS flag indicates that no trailer included at the end of the Ethernet frame.
The RUNNING flag indicates that interface is recognized by the kernel.
The MULTICAST flag indicates that the interface supports a multicast address.
We can change an interface name to a more meaningful and human-readable name. Detailed instructions about renaming an interface is available at http://www.opensolaris.com/use/Migrating.pdf
The ifconfig command can list the interfaces which are already plumbed (available for the kernel to use). If an interface is unplumbed, the command will not show it. We can use dladm command to list all plumbed and unplumbed interfaces.
How it works…
The command reads the network configurations from network configuration files located at /etc/sysconfig/network-scripts/ and /etc/hostname.interface_name files or directly from memory when we do not have any of our interfaces configuration persisted.
There’s more…
The ifconfig command is one of the most useful and handy commands when we deal with network interfaces and network configuration. A complete set of its parameters and options is accessible in the man pages or using the short help format which is as follow
|
|
Getting information for an specific network interface
If we know our interface name and we want to see its detailed information we can pass the interface name to ifconfig command. For example to see detailed information for e1000g0 we can use the following command.
|
|
Other commands for listing network interfaces
We can use some other commands like dladm to list the available network interfaces. dladm can give more details about an interface including speed, state and so on. For example the following command shows the dladm command usage.
The dladm shows both plumbed and unplum-ed interfaces in contrast with ifconfig which only shows plumbed interfaces.

See also
Recipe 2 and recipe three of this chapter discuss how we can configure the network interface in OpenSolaris. Reading them is recommended to grasp better understanding of OpenSolaris networking.
2. Configuring a network interface to obtain IP from a DHCP Server
In chapter 1 recipe we discussed how we can use Network Auto-Magic to configure automatically configure the network interfaces. Now in this recipe we will discuss how we can configure the interface manually without using the NWAM.
Getting ready
To configure a network interface manually we should disable the NWAM using the following commands.
|
|
How to do it…
The ifconfig command we discussed in the previous recipe is our tool for configuring the network interfaces the way we want.
Following command enable the Dynamic Host Configuration Protocol (DHCP) client layer for the e1000g0 network card.
|
|

The command assumes that the interfaces are already plumbed, known to kernel. If not we should plumb the interface using the following command:
|
|
To ask the OS to configure the interface we should create /etc/hostname.e1000g0. The extension specify the interface we want the network/physical:default to configure the interface on boot-up.
To ask network/physical:default service to use DHCP to assign an IP address to this interface we should create /etc/dhcp.e1000g0.
We can create these files using the following command or using normal text editors like gedit.
|
|
How it works…
When we stop the network/physical:nwam service, the OS check whether any configuration files for each one of the interfaces exists or not, if it exists OS will configure the interface accordingly and otherwise the interface will be left un-configured.
There’s more…
Sometimes we want to get a new IP address for our interface or we just do not need the assigned IP anymore and we want to release it to the pool. Following command release the IP assigned to our interface back to the pool
|
|
|
|
See also
In the next recipe we will see how we can configure an interface with a static IP instead of using DHCP. I recommend you review it to get more information about how network interfaces work in OpenSolaris.
3. Configuring network interfaces with static IP address
Sometimes there is no DHCP server around for us to acquire an IP address from its pool or we just want to use a static IP address for our interface. Some use cases for static IP address can be the router, network gateway or our database server.
Getting ready
- To configure a network interface manually we should disable the NWAM
using the following commands.
1\# svcadm disable network/physical:nwam - Do not worry if you cannot understand meaning of the two commands. Simply accept that the svcadm disable the nwam service. In chapter recipe we will discuss svcadm in more details.
How to do it…
The ifconfig command we discussed in recipe 1 and recipe 2 of this chapter provides us with required options to assign a static IP address to a network interface.
Following command assign 192.168.1.110 to e1000g0 with 255.255.255.0 as its subnet mask.
|
|
|
|
Following figure shows how new IP address is assigned to e1000g0 interface.

This configuration cannot survive a system reboot unless we persist it using the network interface declaration files.
To ask the network/physical:default service to configure an interface using an static IP address we should create /etc/host_name.interface_name file and place the configuration information inside it. For example to configure the e1000g0 interface with the same configuration we used above we should create /etc/hostname.e1000g0 file and place the following line inside it.
|
|
How it works…
When OpenSolaris is booting, the network/physical:default check for any available file with a known interface as its extension it execute the ifconfig interface_name inet <each_line_of_the_file> commands sequentially to configure the interface and finally it executes the ifconfig interface_name inet up to bring the interface online.
There’s more…
To bring down an interface we can use the following command:
|
|
See also
First two recipes of this chapter discuss the network interfaces and using DHCP to configure an interface. We can read them to get more information about the network interfaces and configuring them.
6. Configuring FTP Server
The FTP (File Transfer Protocol) is one of the widely used services to distribute files publicly. OpenSolaris comes with both FTP client, ftp command, and FTP server, ftpd daemon. In this recipe we setup an FTP server and use the ftp command to access the FTP server content.
Getting ready
We will use a console window or a virtual console to invoke necessary commands to enable the FTP server. So open the console window by executing gnome-terminal command in the Run Application (ALT+F2) window before getting down to business.
We also need to have a ZFS pool available to us, in our sample commands I used fpool as the practicing pool while you can use any other pool you have previously created. Creating ZFS pools is discussed in recipe 9 of chapter 2.
How to do it…
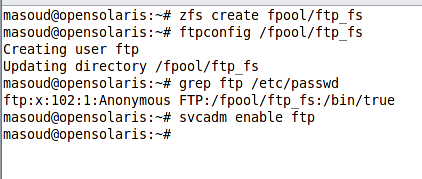
First we should create a file system for the FTP account and shared FTP content. We can do it using the following commands
|
|
|
|
|
|
How it works…
Majority of setting up FTP server tasks is automated and the ftpconfig script is responsible for doing it. What happens when we invoke the command is summarized below:
A user is created with ftp only access
The script enriches the file system we specified with binary files required. For example the ls command is copied into the /fpool/ftp_fs/bin to ensure that FTP user can execute it to get the list of files.
Later on it write down the configuration required for the FTP service so when we run the service, clients can access the /fpool/ftp_fs/pub trough the FTP server.
Following figure shows content of the /fpool/ftp_fs/ which is created by ftpconfig script.
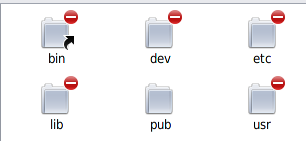
As we can see in the figure, all directories are restricted for the root access except the pub directory which will contain the files we want to share over the network.
See also
Reviewing recipe 10 of this chapter is recommended to see how we can setup Secure Shell (SSH) to ensure the data transfer confidentiality.
7. Configuring DHCP Server ==Done
A Dynamic Host Configuration Protocol (DHCP) server leases IP address to clients connected to the network and has DHCP client enabled on their network interface.
Getting ready
Before we can setup a start the DHCP server we need to install DHCP configuration packages. Detail information about installing packages in provided in recipe of chapter 1. But to save the time we can use the following command to install the packages.
|
|
How to do it…
First thing to setup the DHCP server is creating the storage and initial settings for the DHCP server. Following command does the trick for us.
|
|
The -D specifies that we are setting up a new instance of the DHCP service.
The -r SUNWfiles specifies the storage type. Here we are using plain-text storage while SUNWbinfiles and SUNWnisplus are available as well.
The -p /fpool/dhcp_fs specifies the absolute path to where the configuration files should be stored.
The -a 10.0.2.15 specifies the DNS server to use on the LAN. We can multiple comma separated addresses for DNS servers.
The -d domain.nme specifies the network domain name.
The -h files specifies where the host information should be stored. Other values are nisplus and dns.
The -l 86400 specifies the lease time in seconds.
Now that the initial configuration is created we should proceed to the next step and create a network.
# dhcpconfig -N 10.0.2.0 -m 255.255.255.0 -t 10.0.2.1
Parameters we used in the above command are explained below.
The -N 10.0.2.0 specifies the network address.
The -m 255.255.255.0 specifies the network mask to use for the network
The -t 10.0.2.1 specifies the default gateway
All configurations that we created are stored in DHCP server configuration files. We can manage the configurations using the dhtadm command. For example to view all of the current DHCP server configuration assemblies we can use the following command.
|
|

Each command we invoked previously is stored as a macro with a unique name in the DHCP configuration storage. Later on we will use these macros in subsequent commands.
Now we need to create a network of addresses to lease. Following command adds the addresses we want to lease.
|
|
|
|
The -A 10.0.2.22 adds the IP address 10.0.2.22.
The -f MANUAL sets the flag MANUAL in order to only assign this IP address to the MAC address specified.
The -i 01001BFC92BC10 sets the MAC address for the host this entry assigned to it.
The -m 10.0.2.0 specifies that this host is going to use the 192.168.0.0 macro.
The –y asks the command to verify that the macro entered actually exists.
The 10.0.2.0 Specifies the network the address is assigned to.
Finally we should restart the DHCP server in order for all the changes to take effect. Following command restarts the corresponding service.
|
|
How it works…
When we setup the DHCP service, we store the related configuration in the storage of our choice. When we start the service, it reads the configuration from the storage and wait dormant until it receives a request for leasing an IP address. The service checks the configuration and if an IP was available for lease, it leases the IP to the client.
Prior to leasing the IP, DHCP service checks all leasing conditions like leasing a specific IP address to a client to ensure that it leases the right address to a client.
There’s more…
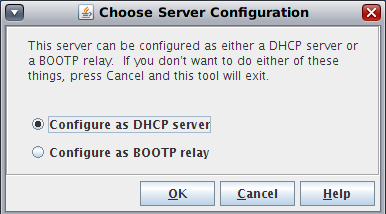
We can use the DHCP Manager GUI application to configure a DHCP server. The DHCP manager can migrate the DHCP storage from one format to another. To install the DHCP manager package we can use the following command.
|
|
|
|
See also
Recipe 5, 6 of this chapter recommended understanding IP assignment better.
8. Assigning multiple IP address to an interface
Like other operating system we can assign multiple IP address to a network interface. This secondary address are called logical interfaces and we can use them to make one machine with one single network interface own multiple IP addresses for different purposes. We may need to assign multiple IP address to an interface to make it available to both internal and external networks or for testing purposes.
Getting ready
We should have one network interface configured in our system in order to create additional logical interfaces.
How to do it…
We are going to add a logical interface to e1000g1 interface with a 10.0.2.24 as its static IP address. Before doing so let’s see what network interface we have using the ifconfig command.

Now to add the logical interface we only need to execute the following command:
|
|
Create a logical interface named e1000g1:1. The naming schema for logical interfaces conforms with interface_name:logical_interface_number which the number element can be from 1 to 4096.
Assign 10.0.2.24/24 as its IP address, net mask and broadcast address.
Bring up the interface.
Now if we invoke ifconfing -a command the output should contain the logical interface status as well. The following figure shows a fragment of ifconfig -a command.

Operating system does not retain this configuration over a system reboot and to make the configuration persistent we need to make some changes in the interface configuration file. For example to make the configuration we applied in this recipe persistent the content of /etc/opensolaris.e1000g1 should something similar to the following snippet.
|
|
To remove a logical interface we can simply un-plumb it using the ifconfig command as shown below.
|
|
How it works…
When we create a logical interface, OpenSolaris register that interface in the network and any packet received by the interface will be delivered to the same stack that handles the underlying physical interface.
See also
Reviewing recipe 2 and 3 of this chapter is recommended as they discuss how to configure a network interface with DHCP or how to manually assign a static IP address to a network interface.
The next recipe can be another source for learning about Virtual Network interfaces capability in OpenSolaris which allows us to add network interfaces to the system using an available physical interface.
9. Configuring virtual LAN interfaces
Here in this recipe we will see how we can create multiple link layer virtual interfaces on top a physical network interface.
Each one of the VLANs is accessible from outside and we can configure them to be used in our services and applications. For example, we can configure our DHCP server to use a VLAN or we can run GlassFish server on it.
Getting ready
Before we can proceed with this recipe we should at least have one network interface installed in our system.
How to do it…
We can create Virtual Interfaces using dladm command which is the utility we will use anytime we need to manage some data link layer entities. Following command shows how we can create a Virtual LAN interface (VLAN).
|
|
|
|
|
|
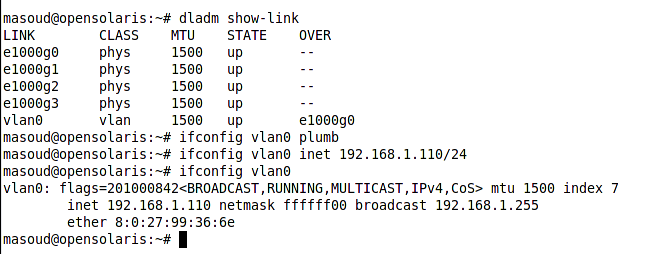
Although the result of dladm command invocations like creating a VLAN is persisted automatically but the ipconfig commands effect will not persist unless we use the interface configuration files as discussed in the recipe 2 and recipe 3 of this chapter.
We can delete a VLAN using delete-vlan subcommand of dladm command as shown bellow.
|
|
How it works…
When we create a VLAN, operating system register its availability and we can see the interface using dladm command. Each VLAN has a distinguished numerical tag which we specified it using the -v option along with a unique name. The name we specified let us to manage and administrate the interface while the specified tag makes it possible for the OS to separate packets intended for this interface in the link layer.
See also
Reviewing recipe 6,5 and 8 in this chapter is recommended to grasp better understanding of network interfaces and IP address allocation.
10. Using IP multipathing and link based failure detection
OpenSolaris provides some features to enhance network reliability including IP Multipathing. In IP multipathing multiple network interfaces installed in the system forms a group of network interfaces and handles each other’s load when one of them fails.
Each interface in the group can be active or standby, meaning that the interface is either handling the traffic or it is reserved to get in and handle the traffic when one of the active interfaces fails.
When we configure a group and we look for network reliability and the reliability requires that system detect the failed interface and let another interface handles its load. Two failure detection mechanisms are supported by OpenSolaris which are as follow:
The probe based, active, failure detection: In active failure detection model, OS constantly probe the interface by sending a probe packet to an exclusive address provided by the interface for failure detection. If system does not receives a reply for its probe packet the interface will be considered faulty.
The link based, passive, failure detection: This model is supported by network interface driver and is the default model OpenSolaris uses. In this model the network interface driver set a flag for the network interface indicating that the interface failed.
In this recipe we configure IPMP group with two active network interface members using the passive failure detection.
Getting ready
Before we can create an IP multipathing group we should make sure that we met the following criteria.
Each interface must have a unique MAC address.
Each interface must be configured with a static IP address.
How to do it…
We will use ifconfig utility for our entire configuration as we are dealing with network layer. In our sample commands we will use e1000g0 and e1000g1 as the two interfaces which form the sm_group.
Fowling figure shows fragment of ifconfig -a command prior to forming the sm_group.

As we can see there is nothing indicating that these interfaces are member of a group and as specified in the figure we two interfaces uses static IP addresses.
Following command will make the group and joins the e1000g0 to the group. One interface can only join one group.
|
|
Following command joins the e1000g1 to the group.
|
|

Like all network configuration we discussed in recipe and 3, the configuration we just made is not persistent over a reboot and we need to add some changes in the network interface configuration files to make the changes persistent on reboot.
In recipe 2 and 3 we discussed how to configure static IP address for an interface and make that configuration persistent over a reboot using hostname.interface_name files stored in /etc/ directory.
To make the grouping configuration persistent we just need to add the group command followed by group_name in the configuration line. For example to configure the e1000g0 we should have a /etc/hostname.e1000g0 file with the following content:
|
|
|
|
How it works…
When we create a multipathing group, OpenSolaris starts probing all interfaces by ICMP packets. When an interface fails to respond to the ICMP packet, the interface RUNNING flag clears and the IP address(es) assigned to the faulty interface get assigned to either a standby interface or to an interface with smallest number of IPs.
See also
Reviewing recipe 2, 3 and 11 in this chapter are recommended to learn more about networking in OpenSolaris. The IPMP-Tutorial Sneak Preview available at
http://sun.systemnews.com/articles/144/1/Solaris/22782 is recommended for getting more insight into the IPMP.
More detailed reference is available System Administration Guide: IP Services located at http://docs.sun.com/app/docs/doc/816-4554/ipmptm-1?a=view
11. Configuring Link Aggregation (Ethernet bonding)
Link aggregation or commonly known Ethernet bonding allows us to enhance the network availability and performance by combining multiple network interfaces together and form an aggregation of those interfaces which act as a single network interface with greatly enhanced availability and performance.
When we aggregate two or more network interfaces, we are forming a new network interface on top of those physical interfaces combined in the link layer.
Getting ready
We need to have at least two network interfaces in our machine to create a link aggregation. The interfaces must be unplumb-ed in order for us to use them in a link aggregation. Following command shows how to unplumb a network interface.
|
|
|
|
|
|

To delete the virtual interface we can use the dladm command as follow
|
|
How to do it…
The link aggregation as the name suggests works in the link layer and therefore we will use dladm command to make the necessary configurations. We use create-aggr subcommand of dladm command with the following syntax to create aggregation links.
|
|
Assuming that we have e1000g0 and e1000g1 in our disposal following commands configure an aggregation link on top of them.
|
|
|
|
|
|

To get a list of all available network interfaces either virtual or physical we can use the dladm command as follow
|
|
|
|

We can change an aggregation link underlying interfaces by adding an interface to the aggregation or removing one from the aggregation using add-aggr and remove-aggr subcommands of dladm command. For example:
|
|
To make the aggregation IP configuration persistent we just need to add create /etc/hostname.aggr0 file with the following content:
|
|
To delete an aggregation we can use delete-aggr subcommand of dladm command. For example to delete aggr0 we can use the following commands.
|
|
In recipe 11 we discussed IPMP which allows us to have high availability by grouping network interfaces and when required automatically failing over the IP address of any failed interface to a healthy one. In this recipe we saw how we can join a group of interfaces together to have a better performance. By grouping a set of aggregations we can have the high availability that IPMP offers along with the performance boost that link aggregation offers.
How it works…
The link aggregation works in layer 2 meaning that the aggregation groups the interfaces in layer 2 of network where network packets are dealt with. In this layer the network layer’s packets are extracted or created with the designated IP address of the aggregation and then are delivered to the lower, higher layer.
See also
Reviewing recipe 2 and 3 in addition to recipe 8 and 9 is recommended.
12. IP tunnelling
An IP tunnel connects one machine to another over a network without the two computers being aware of the intermediate network. The most basic use of IP tunnels is to securely connect two networks through two endpoint interface over an unreliable network. This use case is called Virtual Private Network (VPN).
In OpenSolaris the point to point connection is created using a specific type of interface called IP Tunnel.
Getting ready
We should have a network connection between the two computers we want to create the point to point connection. We can use ping command to check the connectivity between our computers before proceeding with the tunnel setup.
How to do it…
The IP Tunnel interfaces are configured using ifconfig command. Following sequence of commands creates a tunnel between 192.168.1.110 which is our local machine and 66.10.12.1 which is the server.
We need to make the interface available to the kernel.
|
|
|
|
|
|
The ip.tun0 specifies the IP tunnel interface name. The interface name format is ip.tun# which the digit specifies a 0-4096.
The tsrc 192.168.1.110 specifies the tunnel source or the client machine IP address. When we are behind firewall we need to adjust the firewall to let IP protocol 41 packet pass.
The tdst 66.10.12.1 specifies the tunnel destination or server machine. The destination machine must have the service running so we could connect to it.
The thoplimit 60 specifies the maximum number of intermediately hops allowed between the client and the server to form the connection.
We could use one single command to create, configure and bring up the interface.
ifconfig ip.tun0 plumb ip.tun0 tsrc 192.168.1.110 tdst 66.10.12.1 thoplimit 60 up
We used similar syntax in recipe 11 as well.
See also
In this recipe we only setup the tunnel between two machines, for two networks to connect over a tunnel we should define some routing elements. In chapter 5 recipe # we discuss how we can setup routing tables.