Link aggregation or commonly known Ethernet bonding allows us to enhance the network availability and performance by combining multiple network interfaces together and form an aggregation of those interface_names which act as a single network interface with greatly enhanced availability and performance.
When we aggregate two or more network interfaces, we are forming a new network interface on top of those physical interfaces combined in the link layer.
We need to have at least two network interfaces in our machine to create a link aggregation. The interfaces must be unplumb-ed in order for us to use them in a link aggregation. Following command shows how to unplumb a network interface.
1
\# ifconfig e1000g1 down unplumb
We should disable the NWAM because link aggregation and NWAM cannot co-exist.
1
\# svcadm disable network/physical:nwam
The interfaces we want to use in a link aggregation must not be part of virtual interface; otherwise it will not be possible to create the aggregation. To ensure that an interface is not part of a virtual interface checks the output for the following command.
1
\# dladm show-link
Following figure shows that my e1000g0 has a virtual interface on top of it so it cannot be used in an aggregation.
3180_04_14
To delete the virtual interface we can use the dladm command as follow
1
\# dladm delete-vlan vlan0
The link aggregation as the name suggests works in the link layer and therefore we will use dladm command to make the necessary configurations. We use create-aggr subcommand of dladm command with the following syntax to create aggregation links.
In this syntax we should have at least two occurrence of -l interface_name option followed by the aggregation name.
Assuming that we have e1000g0 and e1000g1 in our disposal following commands configure an aggregation link on top of them.
1
\# dladm create-aggr -l e1000g0 -l e1000g1 aggr0
Now that the aggregation is created we can configure its IP allocation in the same way that we configure a physical or virtual network interface. Following command plumb the aggr0 interface, assign a static IP address to it and bring the interface up.
1
\# ifconfig aggr0 plumb 10.0.2.25/24 up
Now we can use ifconfig command to see status of our new aggregated interface.
1
\# ifconfig aggr0
The result of the above command should be similar to the following figure.
3180_04_15
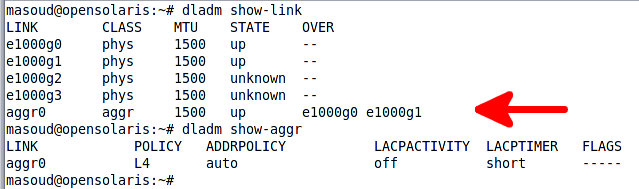
To get a list of all available network interfaces either virtual or physical we can use the dladm command as follow
1
\# dladm show-link
And to get a list of aggregated interfaces we can use another subcommand of dladm as follow.
1
\# dladm show-aggr
The output for previous dladm commands is shown in the following figure.
3180_04_16
We can change an aggregation link underlying interfaces by adding an interface to the aggregation or removing one from the aggregation using add-aggr and remove-aggr subcommands of dladm command. For example:
The aggregation we created will survive the reboot but our ifconfig configuration will not survive a reboot unless we persist it using the interface configuration files.
To make the aggregation IP configuration persistent we just need to add create /etc/hostname.aggr0 file with the following content:
1
10.0.2.25/24
The interface configuration files are discussed in recipe 2 and 3 of this chapter in great details. Reviewing them is recommended.
To delete an aggregation we can use delete-aggr subcommand of dladm command. For example to delete aggr0 we can use the following commands.
1
2
\# ifconfig aggr0 down unplumb
\# dladm delete-aggr aggr0
As you can see before we could delete the aggregation we should bring down its interface and unplumb it.
In recipe 11 we discussed IPMP which allows us to have high availability by grouping network interfaces and when required automatically failing over the IP address of any failed interface to a healthy one. In this recipe we saw how we can join a group of interfaces together to have a better performance. By grouping a set of aggregations we can have the high availability that IPMP offers along with the performance boost that link aggregation offers.
The link aggregation works in layer 2 meaning that the aggregation groups the interfaces in layer 2 of network where network packets are dealt with. In this layer the network layer’s packets are extracted or created with the designated IP address of the aggregation and then are delivered to the lower, higher layer.